Introduction
Blink Outdoor Camera improves home security. A smartphone app can set up and control these wireless, weatherproof cameras for reliable surveillance. Monitor your front door, backyard, or other location.
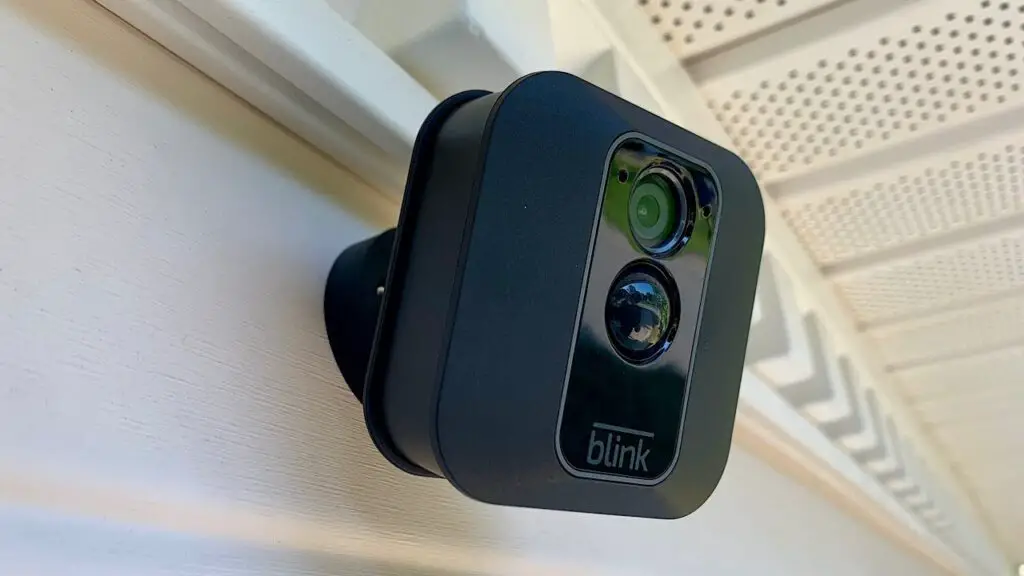
Locate your Blink Outdoor Camera first. Consider regions with a clear view of the surveillance area and robust Wi-Fi signals. The camera should be set high enough for a clear view. The bracket locks the camera securely. Make sure the camera is secure and towards the intended surveillance area.
Mount the camera with the supplied bracket. Screw the mounting bracket into a wall, ceiling, or other suitable spot. For camera stability, secure the bracket. After mounting the bracket, tilt the camera to capture the appropriate area. The Blink Outdoor Camera is easy to tilt and spin to get the right perspective. Tighten adjustment screws to secure the camera.

Where do you hang a blink outdoor camera?
Ideally, the camera should be mounted in an area with a clear view of any points of entry. This could be the front or back door, windows, and garages. Additionally, the camera should be mounted in an area with good lighting and not blocked by trees or other obstacles.
Entry Points: One of the most common and important areas to hang a Blink Outdoor Camera is near entry points such as doors, windows, or garage doors. Placing a camera in these locations allows you to monitor and capture any potential intrusions or suspicious activities.
High-Traffic Areas: Consider hanging the camera in high-traffic areas of your property. This could be a driveway, walkway, or any path leading to your home. By placing the camera in these areas, you can monitor who is coming and going, enhancing your overall security.
Vulnerable Areas: Identify any vulnerable areas on your property that may be more susceptible to trespassing or break-ins. This could include secluded corners, dark spots, or areas with limited visibility. Placing a camera in these spots can help deter potential intruders and provide you with crucial evidence in case of any incidents.
Backyard or Patio: If you have a backyard or patio area, consider hanging a Blink Outdoor Camera to keep an eye on these spaces. This is especially important if you have valuable outdoor equipment, furniture, or if you use these areas for recreational activities.
Perimeter Monitoring: For larger properties, it’s advisable to hang Blink Outdoor Cameras along the perimeter to monitor any suspicious activities around the boundaries. This provides an additional layer of security and helps ensure comprehensive coverage of your property.
Can I stick Blink camera to wall?
Blink Mini Cameras
Mount your camera on a wall, shelf or most flat surface and ensure it’s always in the best location for the best performance.
Adhesive Mounts: Blink offers adhesive mounts specifically designed for their cameras. These mounts come with a strong adhesive backing that securely attaches to various surfaces, including walls, ceilings, or any other flat surface.
Surface Preparation: Before sticking the adhesive mount to the wall, it’s important to prepare the surface properly. Ensure that the surface is clean, dry, and free from any dust, dirt, or debris. Cleaning the surface with a mild detergent or alcohol wipe can help ensure optimal adhesion.
Mounting Placement: Select the desired location on the wall where you want to place the Blink camera. Consider factors such as the field of view, accessibility, and the camera’s ability to capture the desired area effectively. Make sure the chosen spot allows for easy access to the camera and any necessary adjustments.
Attaching the Adhesive Mount: Remove the protective backing from the adhesive mount and firmly press it against the wall in the desired location. Apply even pressure for a few seconds to ensure proper adhesion. Allow the adhesive to set and cure according to the manufacturer’s instructions before proceeding.
Camera Installation: Once the adhesive mount is securely attached to the wall, you can attach the Blink camera to the mount. The camera easily slides or clicks into place, depending on the specific mount design. Ensure that the camera is properly aligned and securely attached to the mount.
How do I attach a blink camera to the wall?
Mounting the Blink Mini Camera
While holding the mount in both hands, apply pressure to the outer ring while supporting the mount with the opposite hand. Select a location to mount your camera. When you’ve decided where it will go, use the included screws to secure the mount to your surface.
Gather the necessary tools: Before you begin, make sure you have all the tools required for the installation. This typically includes a screwdriver or drill, screws, and wall anchors (if necessary).
Choose the mounting location: Select the optimal location on the wall for your Blink camera. Consider factors such as the field of view, accessibility, and the camera’s ability to capture the desired area effectively. Ensure that the chosen spot provides a clear view without any obstructions.
Mark the mounting holes: Hold the mounting bracket against the wall in the desired location. Use a pencil or a marker to mark the positions of the mounting holes on the wall. Double-check the alignment and adjust as needed.
Pre-drill the holes: If necessary, pre-drill pilot holes at the marked positions on the wall. This step helps prevent the wall from splitting or cracking when inserting the screws.
Install wall anchors (if needed): If you’re mounting the camera onto a hollow wall or a surface that requires additional support, insert wall anchors into the pre-drilled holes. Wall anchors provide stability and ensure a secure attachment.
Attach the mounting bracket: Line up the mounting bracket with the pre-drilled holes or wall anchors. Insert the screws through the bracket and into the wall, using a screwdriver or drill to secure them firmly. Make sure the bracket is level and securely attached to the wall.
What is the distance for Blink outdoor camera?
100 ft. away
How far away can camera units be placed? Under normal circumstances, the Sync Module is capable of communicating with Blink cameras up to 100 ft. away in any direction.
Position the sync module strategically: Place the sync module in a central location within your home to ensure better coverage and signal strength. Avoid placing it near other electronics or objects that could interfere with the signal.
Use Wi-Fi range extenders: If your Wi-Fi signal doesn’t reach the desired location of the camera, consider using Wi-Fi range extenders or mesh network systems to extend the coverage area. These devices amplify the Wi-Fi signal, helping to bridge the gap between the camera and the sync module.
Optimize Wi-Fi signal strength: Ensure that your home’s Wi-Fi network is functioning at its best. Position the Wi-Fi router in a central location, away from obstructions, and consider upgrading to a more powerful router or adjusting its settings for better coverage.
Reduce interference: Identify and minimize sources of interference that could affect the Wi-Fi signal. Devices such as cordless phones, baby monitors, or microwave ovens can interfere with the signal strength. Keep these devices away from the camera and sync module to minimize interference.
Obstacles such as walls, floors, or other structures can diminish the signal strength and reduce the effective range. Thick walls, metal surfaces, or other electronic devices can interfere with the Wi-Fi signal, potentially limiting the camera’s range.
Can blink outdoor cameras zoom in?
Optional: Basic and Advanced options are included for Wired Floodlight, Indoor and Outdoor (3rd Gen), and XT2 cameras. Advanced mode allows you to zoom into the thumbnail for more precise zone selection. Swipe to move the view and tap to select areas that are active or inactive for motion detection.
The Blink outdoor cameras have a fixed lens that captures a predetermined field of view. This fixed lens allows for simplicity and ease of use, as well as ensuring a cost-effective solution for home security.
While the lack of zoom capability means that you cannot digitally or optically zoom in on specific details within the camera’s field of view, the Blink outdoor cameras are designed to capture a wide area to monitor and detect any activity or motion within that range. This wide-angle perspective provides a broad view of the surroundings, maximizing coverage and minimizing blind spots.
The Blink app does offer the option to digitally crop and enhance a portion of the camera’s field of view after capturing an image or video clip. This feature, known as “Digital Pan and Zoom,” allows you to zoom in on a specific area of interest within the captured footage, albeit with some loss in resolution.
If zoom capability is a priority for your surveillance needs, you may need to consider other camera options that offer optical or digital zoom features. It’s important to carefully evaluate your requirements and compare different camera models to find the one that best suits your specific needs.
How many cameras can you have on Blink outdoor camera?
The Blink app allows you to manage multiple Sync Module systems and their connected Blink devices from a single account. Each Sync Module added to your account allows you to group and manage up to ten cameras in a single system.
Blink XT2: The Blink XT2 system supports up to 10 Blink cameras per sync module. This means you can have a maximum of 10 Blink XT2 cameras connected to a single sync module.
Blink Outdoor: The Blink Outdoor camera system also supports up to 10 Blink cameras per sync module. Like the Blink XT2, you can connect a maximum of 10 Blink Outdoor cameras to a single sync module.
Blink camera requires its own individual sync module to connect to the Blink app and your Wi-Fi network. The sync module acts as the bridge between the cameras and your smartphone, enabling live viewing, motion detection alerts, and other features.
If you require more than 10 cameras for your surveillance needs, you can set up multiple sync modules and distribute the cameras across them. For example, if you want to have 15 cameras, you can set up two sync modules and connect up to 10 cameras to one sync module and the remaining 5 cameras to the other sync module. This allows you to expand your camera system and cover a larger area.
Blink system, it’s important to consider the Wi-Fi signal strength and coverage. Ensure that your Wi-Fi network can support the number of cameras you intend to install, and consider optimizing your network with range extenders or mesh systems if necessary.
Can blink outdoor camera rotate?
Adjustable Rotation
Easily adjustable with 360-degree swivel and 90-degree tilt, allows you to adjust your blink outdoor to point anywhere you want with any angle. 1. Mount your blink cameras in ceilings, eaves or walls and gives you more choices on where you can install your cameras.
Blink outdoor camera, you can adjust the camera’s angle within its mounting bracket to capture the desired field of view. The camera can be tilted and rotated manually to cover the area you want to monitor effectively. Once the camera is positioned and locked in place, it remains in that fixed position until physically readjusted.
It’s important to choose the camera’s mounting location carefully to ensure optimal coverage of the desired area. By selecting the appropriate mounting position and adjusting the camera angle during installation, you can maximize the camera’s field of view and capture the necessary surveillance footage.
If you need to change the camera’s view or cover a different area, you will need to physically reposition the camera by adjusting its angle or moving it to a new location on the wall or mounting surface. This requires manual intervention and cannot be done remotely or through the Blink app.
While the lack of motorized rotation may limit the camera’s ability to cover a wide range without physically adjusting it, it also simplifies the installation and operation process. The fixed position of the Blink outdoor camera ensures durability and reliability by eliminating moving parts that could potentially wear out or malfunction over time.
Can blink outdoor cameras see at night?
Yes, Blink cameras work at night, thanks to the IR LED embedded into the device. This helps your camera capture a clear black-and-white image even during low light conditions.
Infrared Illumination: Blink outdoor cameras have built-in infrared LEDs that emit infrared light, which is invisible to the human eye but can be detected by the camera’s image sensor. This illumination provides the necessary lighting for the camera to capture detailed black and white footage in low-light or complete darkness.
Automatic Activation: The night vision feature of Blink outdoor cameras is designed to automatically activate when the camera detects a low-light environment. As the ambient light decreases, the camera switches to night vision mode, ensuring that it continues to capture clear footage in the dark.
Effective Range: The effective range of the night vision capability may vary depending on the specific model of the Blink outdoor camera. Generally, the range is around 20 feet (6 meters), allowing the camera to capture detailed footage within this distance in complete darkness. However, it’s important to note that factors such as ambient light conditions, obstructions, and camera placement can affect the effective range.
Monochrome Footage: When the camera is in night vision mode, the recorded footage appears in black and white. This is because the camera captures the infrared light reflected by objects in the environment, rather than the visible spectrum of light.

Conclusion
The process begins with selecting an ideal location that offers a clear view of the desired surveillance area and a strong Wi-Fi signal. Installing the mounting bracket securely is crucial to ensure the stability of the camera. Adjusting the camera angle allows you to capture the desired field of view, and attaching the camera to the bracket ensures a secure and aligned placement.
Once the security camera is hung, connecting it to the Blink app enables you to control and monitor the camera remotely from your smartphone. Through the app, you can adjust settings, receive motion alerts, and access the live feed for real-time monitoring.
Regularly testing and maintaining your Blink Outdoor Camera is essential to ensure its continued functionality and effectiveness. Periodically check the camera’s positioning, adjust settings as needed, and ensure that the camera remains securely mounted.
By installing a Blink Outdoor Camera, you gain the peace of mind that comes with enhanced security measures. You can confidently monitor your property and deter potential intruders or suspicious activities. The convenience of remote access and control via the Blink app further enhances the overall user experience.

